Loading

Infoklik: How to open Microsoft Office 2007 files on Microsoft Office XP


Most of my friends have upgrade their Microsoft Office from Microsoft Office XP to Microsoft Office 2007. I'm kind of not really ready to upgrade from Microsoft office XP to Microsoft Office 2007 yet. My problem i faced that when i copy files of Microsoft Word 2007 from my friends and open it on Microsoft Word XP. It couldn't open it. The files extension for Micorsoft Office Word is .docx while the files extension for Microsoft Office XP is .doc . In order to open files of Microsoft Office 2007 on Microsoft Office XP, you will need to install files converter then open it as usual.

Download File Format Converter here.

Note: It is recomend that you scan the files using your updated anti virus. Don't worry about the language as it appear on the first screen. After you install it, it will let you to choose your language. Use at your own risk.

Good luck!!

Read More...

Infoklik : How to download multiple files from rapidshare with Internet Download Manager (IDM)


For those who really don’t have idea about what the rapidshare and Internet Download Manager (IDM) is. Well rapidshare basically is a file hosting web that allows us to upload and download files. I like that website because it really allows us to download files with a highest speed. If you are interested to learn more about rapidshare, you can visit to their website at www.rapidshare.com .

Meanwhile IDM is a software or a tool to increase download speed by up to 5 times. You can learn these by visit to their website at www.internetdownloadmanager.com

To download the multiple files from rapidshare with IDM, you will need a Premium account and the IDM (installed on your computer). For the IDM, I recommended that you download the latest version. Once you have it, you can go to the following steps below:

1. Go to www.rapidshare.com , Click Premium Zone -> Premium Zone Login . Enter your Login and password.


2. Once you have successful login. Click Settings then click the Deactivate Security-Lock button. Then it will ask for Release Code. Click Deactivate Security-Lock button.


3. On Configuration, Checked the Direct downloads, requested files are saved without redirection via rapidshare. Then click Save at the bottom.. Click Activate Security-Lock.


4.Now go to the website you want to download. Highlight all the rapidshare link. Right Click Mouse. Click Download With IDM.


5.You may wait a few second to allow the IDM to determine the size of the files. Then Click Check All button. Then Click OK button.


6. Highlight all the links then click Resume button.


Thats It !! Good Luck!!


Read More...

Infoklik : Windows Shortcut Keys On Your Keyboard


Shortcut keys are a combination of keys that to provide a quick way of action.

These are an example of shortcut keys:

Alt + Enter = View properties on the selected item
Alt + Esc = Open to the active window in the cycle order.
Alt + F4 = Close the active item, or quit the active program.
Alt + Tab = Switch between open programs.
Alt + Underline letter in menu = Open the menu
Alt + F6 = Switch between multiple windows in the same program
Backspace = Will go to one level up of the folder in My Computer or Windows Explorer

Ctrl + Esc = Display start menu
Ctrl + A = Select All items in the current window
Ctrl + X = Cut
Ctrl + C = Copy
Ctrl + V = Paste
Ctrl + Z = Undo last action


F1 = Display Help
F2 = Rename selected items
F3 = Search for files or folder
F4 = Display the address menu bar in My Computer or Windows Explorer
F5 = Refresh the active window
F6 = Moves among panes in windows explorer
Winkey = Open or Close start menu
Winkey + D = Minimize all windows
Winkey + E = Open windows explorer
Winkey + F = Search for files or folder
Winkey + F+ Break = Display system properties dialox box
Winkey + L = Lock the desktop
Winkey + M = Minimize the all windows
Winkey + R = Open Run dialog box
Winkey + Tab = Swith between open items

Read More...

Infoklik : What is VNC ?


VNC stands for Virtual Network Computing. It is remote control software which allows you to view and fully interact with one computer desktop (the "VNC server") using a simple program (the "VNC viewer") on another computer desktop anywhere on the Internet. The two computers don't even have to be the same type, so for example you can use VNC to view a Windows Vista desktop at the office on a Linux or Mac computer at home. For ultimate simplicity, there is even a Java viewer, so that any desktop can be controlled remotely from within a browser without having to install software.


VNC is in widespread active use by millions throughout industry, academia and privately. There are several versions to choose from, including a free version and some substantially enhanced commercial versions.


You can download a copy VNC here.


How to setup / configure VNC on your LINKSYS Etherfast Cable/DSL Router with 4-Port Switch ( BESFR41 )

This assume that you already installed your VNC. For more information on the VNC documentation you can click here.
To setup / configure your router :
1. go to router configuration by typing : 192.168.1.1 on the web address.
2. insert user and password admin. click ok
3. go to Application & Gaming -> UPnP Forwarding
4. Fill in below :
application : VNC
Ext. Port : 5900
TCP/UDP : TCP
Int. Port : 5900
Ip address : 192.168.101
Enable : Checked
(Note : Your Ip address could be different from your pc)
5.Click Save Settings.

If you wish add more than 1 pc you could see picture below :


To check ip address :
you could mouse over the VNC server on your right bottom near your clock pc.


To check VNC Server port :
Double click the VNC Server, go to connections tab.
or

1.goto start -> all programs -> RealVNC
-> VNC Server (Service Mode) -> Configure VNC Service

2.Click connections tab


To test your VNC Server click here.

Common problem
1.unable to connect to host: Connection timed out (10060)
Solution :
Check your firewall setting to allow VNC Service.
Check the Internet Security setting
to allow VNC Service.

2.More FAQ on VNC click
here.

Good Luck!!


Read More...

Infoklik : Nokia N95


Nokia N95 key Features


Search
  • Built-in GPS mapping.
  • Nokia Web Browser with Mini Map.
  • Location-based mobile search.
Connectivity
  • View email with attachments.
  • Play your videos on compatible home electronic devices via TV-out cable or UPnP architecture.
  • Connect to your compatible PC via USB 2.0, or Bluetooth wireless technology, or WLAN.
MP3 Player

  • Stream your music wirelessly to your compatible headphones, home or car stereo.
  • Hook up your favorite or home stereo speakers.
  • Store up to 2GB of sound with expandable memory.
Imaging
  • 5 megapixel camera.
  • Carl Zeiss optics.
  • 2.6" display.
  • shoot in DVD-like quality video up to 30 frames per second.
  • Post your photos directly to Flickr.
Customize
  • Customize your device with advance mobile applications.
  • Support for RSS feeds.
----------------------------------------------------------------------------------------


Read More...

Infoklik : Enable registry (Windows XP)


Have you ever run the Tweak UI utility for Windows XP and it comes up with error message “Tweak UI has been disabled by your administrator” or run registry and it displays message “Registry editing has been disabled by your administrator” ? This is because DisableRegistryTools policy on the registry has been enable or in other word the system registry has been disabled. How to Enable registry ? You could try one of the following method below :


Method 1

Go to Start -> run

Type :

REG add HKCU\Software\Microsoft\Windows\CurrentVersion\Policies\System /v DisableRegistryTools /t REG_DWORD /d 0 /f


Method 2

  1. Create a text file and save the text file as “RegON.bat”
  2. Copy and paste to your file “RegON.bat” below :

REG DELETE HKCU\Software\Microsoft\Windows\CurrentVersion\Policies\System /v DisableRegistryTools

Don’t forget to save your “RegON.bat” file.

  1. Close your reg.bat file and double click the “reg.bat” file.
  2. Type Y.
Example :


Method 3 (Windows XP Professional only)

  1. Go to Start -> run
  2. Type : gpedit.msc
  3. Go to User Configuration -> Administrative Templates -> System
  4. Double click Prevent access to registry editing tools
  5. Select enable then click button Apply
  6. Select Not Configure then click button Apply then Click Button Ok.


Disable registry

Here are the way how to disable registry :

  1. Create a text file and save the text file as “regoff.reg”
  2. Copy and paste to your file “regoff.reg” below :

REGEDIT4

[HKEY_CURRENT_USER\Software\Microsoft\Windows\CurrentVersion\Policies\System]

"DisableRegistryTools"=dword:1

Don’t forget to save your “regoff.reg” file.

Close the “regoff.reg” file and double click “regoff.reg” file and then click button yes


Good Luck !!


Read More...

Infoklik : Autorun / Autoplay ? ( Malay )


Apa itu Autorun / Autoplay ?
Autorun / Autoplay adalah suatu fungsi automatik berkaitan dengan media penyimpanan data seperti CD atau DVD mahupun pen drive. Secara ringkasnya apabila media penyimpanan data seperti CD, DVD atau pen drive dimasukkan ke dalam komputer, komputer tersebut akan mencari file autorun.inf. Apabila menjumpai file tersebut maka komputer secara automatik melaksanakan program yang telah disetkan.


Bagaimana hendak membuat autorun / autoplay pada thumb drive / pen drive dalam Windows XP ?

Untuk membuat autorun pada thumb / pen drive anda , Sila ikuti langkah di bawah :

1. Buat file bernama autorun.inf pada thumb drive / pen drive anda.

2. Copy and paste ke autorun.inf

[autorun]
shellexecute=mrs.exe
icon = mrs.exe
action = mrs.exe
useautoplay=1

Jangan lupa untuk save autorun.inf

Contoh :


Selamat Mencuba !!

Read More...

Infoklik : Autorun / Autoplay ? ( English )


What is Autorun / Autoplay?

Autorun, or "Autoplay", are extended automatic functions associated with removable media such as CDs and DVDs. The foundation of this feature is the insert notification support in the device driver. Most, if not all, removable devices available today support this feature. After Windows detects that a disk has been inserted, it looks in the disk's root directory, finds, reads, and follows specific instructions defined in a text based configuration file, Autorun.inf.


In short, a computer looks for an "autorun.inf" file within any removable media inserted into it, such as a floppy, CD, or DVD, and if such a file is found, treats the media as an Autorun device. This is the essense of applications automatically launching when a CD/DVD is inserted into a computer. An prime example of this would be the "setup" application executing when a product's CD is inserted.

The Autorun.inf file defines the process or application that will automatically run when a disk is inserted. The Autorun file can also define the following, among other things:


How to make autorun / autoplay on your thumb drive / pen drive in Windows XP ?


To Create an autorun on your thumb / pen drive please follow these steps below :

1. Create an autorun.inf on your thumb / pen drive.

2. Copy and paste to your autorun.inf

[autorun]
shellexecute=mrs.exe
icon = mrs.exe
action = mrs.exe
useautoplay=1

Don't forget to save your autorun.inf

Example :


Good Luck !!

Read More...

Infoklik : What is Thumbs.db file ?


Thumbs.db is Microsoft's way of caching thumbnail images of any image or movie file in a folder. The idea behind creating a thumbnail cache is to improve the speed of displaying thumbnails the next time you open the folder by caching a set of thumbnails for the image and video files in the folder. If you hadn't seen this file in your folders previously it's likely you didn't have "Show hidden files and folders" enabled. Deleting the Thumbs.db file simply deletes that cache, which is regenerated the next time you view the folder contents. It is possible to configure Windows to never cache thumbnails.
How to turn off ?
Windows XP
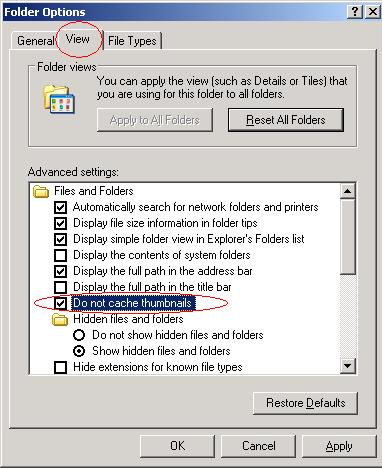
go to Start->Control Panel-> Folder options
on Folder options select view tab
check the Do no cache thumbnails. (see picture below)


Read More...